How to Setup Virtualization on Windows 8 Using Hyper V
Virtualization is increasingly becoming the trend with enterprises and private consumers, as it is cost-effective and reliable. The reliability quotient of a virtualized system is enhanced by the operating system used. With all the major operating systems finally out for 2012, let’s take the most-anticipated operating system of the year ‘Windows 8’ into consideration for setting up virtualization. Windows 8 is a radical operating system that would be the best fit for setting up a virtualization, as it supports Hyper V virtualization functionalities. The functionality is available under the name Client Hyper V, in order to distinguish itself from the well-known Windows Server virtualization hypervisor Hyper V.
Client Hyper V helps Windows 8 desktop users set up their own private virtualization independently. One has to take note that Client Hyper V is not a built-in feature with Windows 8, hence it has to be set up manually, provided that certain system requirements are met. There are different methods to set up a Client Hyper V hypervisor. Recreating functionalities found in previous versions and running other operating systems apart from Windows are two of the popular methods. In addition, Client Hyper V requires stringent hardware requirements such as a 64-bit processor that supports Second Level Address Translation and minimum of 4 GB RAM. Once the system requirements are met, then commence on the process of setting up virtualization. I have elaborated the steps in detail below:
- Firstly, enable the Client Hyper V by selecting ‘Programs and Features’ and clicking the link to turn on Windows features. Then proceed with the basic prompts to start the set up. Next, navigate to the search option and enter Hyper V Manager to take notice of the menus on the right hand side.

- The next step would be to select new and create a new virtual machine. Then navigate to Virtual Switch Manager to create Network Interface Controllers (NICs) to enable sharing with the virtual machine.

- As the NICs are set up, the next process would be to a virtual hard drive. You can use the wizard to set up the hard drive. Creating a fixed disk hard drive is the most feasible option and this can be done by using the thin provisioning method. Set virtual hard drive memory capacity as 2 TB and then proceed to the next step, which is configuration.
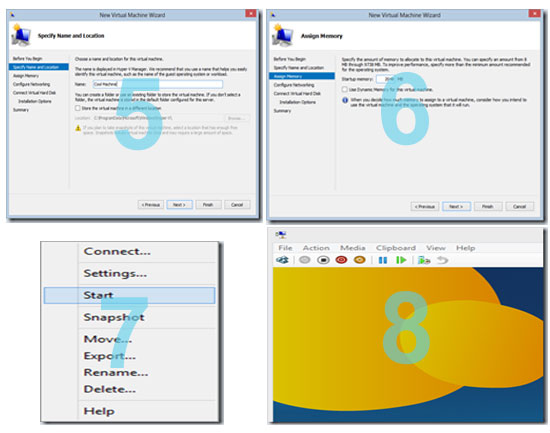
- Now that the hard disk is created, navigate to new and create a name for your virtual machine and choose the location where you would like to store it. With the new Client Hyper V you have the option of specifying memory capacity of the RAM; this process is called dynamic memory allocation.
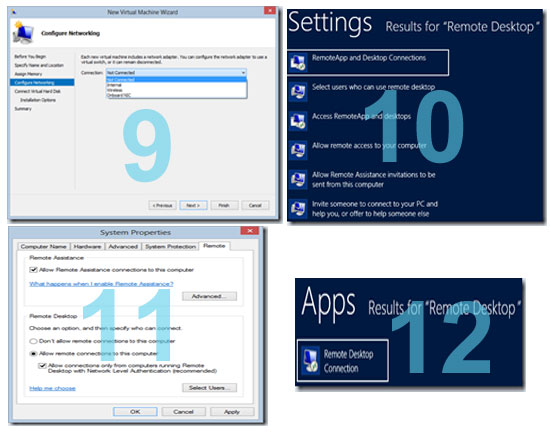
- The next process is to configure the network connection and choose the Integrated Drive Electronics interface controller. The only option in terms of network is to choose the network that you are currently connected to. Now you can boot your new virtual machine.

- To boot the virtual machine, right click on the selected virtual machine and choose start to start the boot up process. Once the operating system is installed, you have to install the integration services by clicking the Action menu.
- To add enhancements to virtual machine, host back from a remote desktop to virtual machine in order to render a complete list of integrated functionalities. Setting up a remote desktop connection on Windows 8 is simple. Connect to the remote desktop and search for apps and default search results. Finally, choose the remote desktop connection and enter the virtual machine’s host name.
This is a guest post by Lance Goodman of dishtvoffer a site that offers savings and current information on Dish TV.


